
Looking for a fun and creative way to add beautiful colour blends to your lettering and artwork?
If you love bright colours, blending and pens, you're going to love these three easy ways to blend Karin Brush Marker Pro pens, from a really simple two-colour blend to creating colourful rainbow effects and beautiful watercolour backgrounds.
When I first bought these pens, I did a swatch test video and I was obsessed. They are so juicy and lovely, and juicy pens are the perfect pens for blending!
So, let’s dive in and I’ll show you how you can blend these pens in a variety of different ways.
If you’d prefer to follow along visually, you can watch the full step-by-step tutorial.
👉 Watch on YouTube: https://www.youtube.com/watch?v=-8k_RhpRKKU

The colourful rainbow lettering created using several colours on the blender pen
What you’ll need
Before I dive into the blending tutorials, here are some of the tools and equipment I’m using:
Karin Brush Marker Pro pens
Smooth watercolour paper
A scrap piece of paper
A ceramic dish, plate or clean paint palette
A paintbrush
A water brush
A glass of water
A cloth for cleaning your brushes
I’m using smooth watercolour paper because these pens are super juicy, so it works really well for mixing the colours. The paper is also quite durable, which is useful when we’re doing lots of different blending techniques.
I’m making sure it’s smooth watercolour paper because if the paper is too textured, the tips of the nibs can fray. I have found that the Karin Brush Marker Pro tips are very durable, though!
My scrap piece of paper is also going to come in really handy when we’re doing lots of different blending techniques. I use it to clean off any excess ink from the nibs as I go.
1. Direct blending with two Karin markers
The first blending technique I have for you today is super simple. You need two Karin pens, so even if you don’t have the big set, this will work for you.
First up, you’ll need two different colours, ideally a slightly darker one and a lighter one.
I’m going to use Magenta Red and Canary Yellow.
For this first method, I’m simply going to colour in the tip. There are a couple of ways you could do this. You could hold the tips together and let the ink from the red soak into the yellow.
What I quite like to do, because I do calligraphy, is actually colour in the side of the pen. You can hold it down a little bit longer just to let the ink seep in.
Because these are liquid, water-based pens, you don’t need to worry about ruining the tip.
Now I’m going to take the Canary Yellow pen and we’re just going to write with it.
These are great for brush lettering because they have a flexible tip, but you can use them for colouring as well. I absolutely love blending with these.
How beautiful does that look?
You can see here that it started off with the red and it’s blended out to the yellow. Because these pens are so juicy, this transition is so smooth and it just looks stunning.

The red and yellow blend transitioning from one colour into the other
Don’t forget your scrap paper
You’ll see on the tip that there is still some red on here, and that’s what our scrap paper is for.
Every time you do any sort of blending, I really recommend just taking a scrap piece of paper and colouring on it. You can see that the colour is starting to come off.
Sometimes you might get a tiny bit of staining left over, but it’s not going to affect the colour of the pen at all.
Let’s try it with some other colours.
The red and yellow work really well together because they’re on a similar part of the colour spectrum. But what happens if we blend two quite different colours?
For this next blend, I’m going to take Cool Aqua and Magenta.
I’m going to do exactly the same thing I did previously. Because the blue is slightly lighter, I’m going to colour in that nib instead.
You will find that some of the blue ink will pick up on the pink ink. If you don’t intend to use that pen straight away, that’s fine. Once you’ve done your calligraphy or colouring, just go onto the scrap piece of paper and give it a little scribble.
You can see it started off with this pink and it’s kind of like a purpley colour, which looks so nice, and then it’s just going down into the light blue.
How beautiful does that look?
That would be really good for things like colouring in as well.
If we take the pink pen, we can see it started off with a little bit of purple and then it’s going down into the pink. You can see why we tend to use the lighter colour pen to do the blending and fill that in with the dark colour pen.
If you just wanted to add a subtle bit of shading, that’s a great way of doing it.
Try blending on a palette
Another way you could do this direct blending method is actually by using your ceramic dish, plate or paint palette, whichever you’ve got.
I’m going to use Arctic Blue, Royal Blue and Magenta Red.
I’m going to use the Arctic Blue to do my calligraphy, but I’m going to pick up multiple colours.
All you need to do is scribble on your ceramic dish. Then take your pen and pick up the ink. You can pick up some of the red and some of the blue, and then write.
You can always go back in and dip and pick up some more colour.
You can get really creative with how you blend these pens together just from mixing a few of the inks, whether it’s nib to nib or using a little paint palette dish like this.
You can get so many cool effects!
2. Blending with a Karin Blender Pen
The next method of blending these Karin Brush Marker Pro pens is using a pen called a Blender Pen.
As you can see, there is ink in the barrel, but it’s a clear ink. That means we can use the ink in this barrel to blend different colours together.
It looks exactly the same as all the other pens except for the nib, which is just plain white. If I were to write anything, you can see there’s nothing coming out, although I can see a little bit of wetness on the paper.
Basically, it’s a clear ink that’s perfect for blending.
There are a couple of different ways we can use this pen.
Blend two colours together
If I take a light colour, such as Apple, and a darker colour, such as Ocean Teal, I can colour separately on the piece of paper.
Firstly, I’ll go in with the light colour and then the darker colour next to it.
Then, with the Blender Pen, I can go in and the clear ink will help blend the colours together.
It’s just really cool!
You can even mix colours with it. If I were to put down this light green again and then decide that I wanted it a little bit darker, I could pop a little bit of that green in the centre and then blend it out.
This is a really good way to add little bits of shading to your lettering, or if you’re doing any colouring in or any sort of art really.
And, just like the other pens, to get rid of some of that ink on the Blender Pen, I’m just going on the scrap piece of paper and wiping it off.

The blue and pink blender pen effect becoming more pastel
Create a beautiful pastel effect
This is actually my absolute favourite way of using this pen.
I’m going to use it in a similar way to how we’ve used the previous pens, by colouring in the tip.
This is going to be our light base. For this method, I’m going to use Cyan and Red Lilac.
Firstly, I’m just colouring in this side of the Blender Pen and then I’m going to take the blue.
What I like about this is that it starts to blend together on the pen. But because I’ve done half and half, you get a really cool effect.
We’ve got some of the blue there and you can see some of the pink coming through as well.
Now, because this pen has a clear ink, what it actually does is end up making the colour slightly pastel after a few strokes.
I absolutely love that effect!
You can actually use it for creating shading. If I just go back in with the blue and do some scribbles, you can see it starts off quite pigmented and then it goes to pastel.
What this means is that this Blender Pen increases the range of colour. If you want some pastel colours or to do shading, then you can use this Blender Pen to really add depth, which is so cool.
Go crazy with colour
You don’t have to stick to just two colours either.
For this next one, we’re going to go a little bit crazy and add a few different colours onto the pen.
I’m going to add a little bit of Pale Violet, some Magenta, Cool Aqua, Yellow and Red.
Now, if I were to write, you can see that it’s created a rainbow of colours.
What you can do when you’re writing is twist the pen around so you can get all of these different colours.
Because I haven’t saturated it too much, it has gone pastel quite quickly, but you can always just add more colours to it.
But how beautiful is that? Look at all those colours!
They are absolutely stunning.
If you want to keep it a little bit more saturated so it doesn’t go pastel too quickly, then you can always use the ceramic dish or paint palette method.
Just colour in a few little swatches and then pick up the colours from there.
It’s important to consider the colours that you’re mixing, though. You can see here that the yellow has gone a little bit of a muddy colour, and that’s just because I still had some of the purple on my pen.
If you want to be careful about what colours you’re mixing, just remember to go over to your scrap piece of paper if you want to get rid of any colour. Then you can always go back in, pick up some more ink and brighten it up a little bit.
3. Blend Karin Markers with water
For the third method of blending, we’re going to be using some water.
Because these pens have a liquid, water-based ink, it means you can kind of use them like watercolours.
I absolutely love doing this!
For these techniques, I’m going to be using a normal paintbrush, which I’ll be dipping in water, and a water brush pen as well. This just has a barrel that’s already filled with water, so it makes things a little bit easier.
I’ve also got a slightly larger brush so I can show you how to create watercolour backgrounds.
There are a couple of different ways that we can use water to blend these pens.
Create a watercolour effect
The first way is very simple.
Just like some of the other blending techniques we’ve done, you can do it directly onto the paper.
I’m going to take my normal paintbrush and paint very lightly with it.
You can see that it brings the ink to life a little bit. It’s blending the colours together and creating a lovely watercolour effect.
If you find that some of the pigment has picked up a little bit, you can always go quite lightly in with the pen to add a little bit more pigment.
This works really nicely for calligraphy too.
If I write a word and add a little bit more darkness towards the tops of the letters, I can then go in with my water brush and pull the colour down.
This gives me a little bit more control, so if you have quite detailed areas, you can use a small paintbrush.
This method is great on thinner strokes where I just want a little bit more control with the blending.
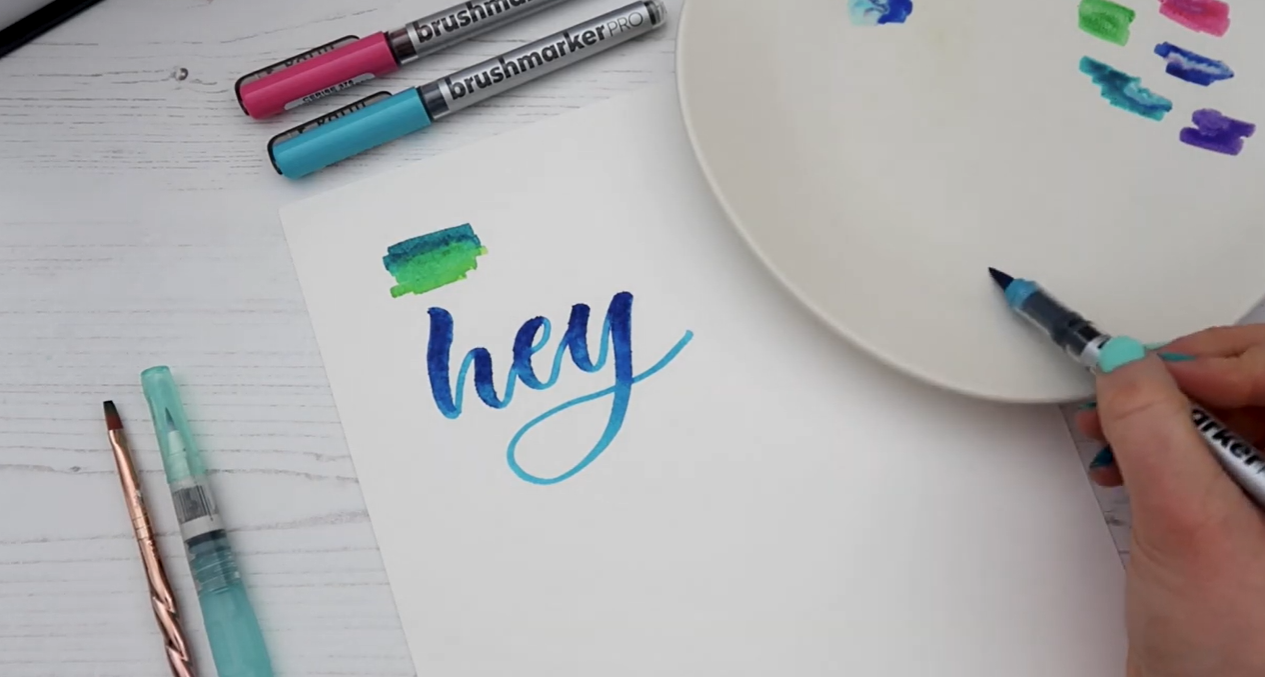
The watercolour blending on the lettering
Mix colours with water
If you want to use a couple of different colours, you can always use a palette again.
Take your water brush and add a little bit of water to the ink. It’s immediately lightened it up and made it quite a pastel colour.
Obviously, the more water you add to it, the lighter it will get.
You can even start mixing some of these colours together so they can act just like watercolours.
You can see I’m mixing these two together and then I can paint with them.
If I want a little bit more pigment, I can go back in with the pen.
Can you see it? It’s acting very similarly to watercolours.
Especially when you’re using watercolour paper, you can really add some lovely detail.
This isn’t just for calligraphy either. If you want to do something like florals, you totally could.
The pigmented colours really come to life when it comes to mixing using water.
Create colourful florals
I’m obviously doing this with my own calligraphy, but you could absolutely use these techniques for floral artwork.
I’m going to add a little bit more yellow here, and you can see where the blue and yellow are mixing is creating a lovely green colour.
You can then use the same technique to create colourful flowers and other artwork.
It’s amazing how working with these pens really acts like watercolours.
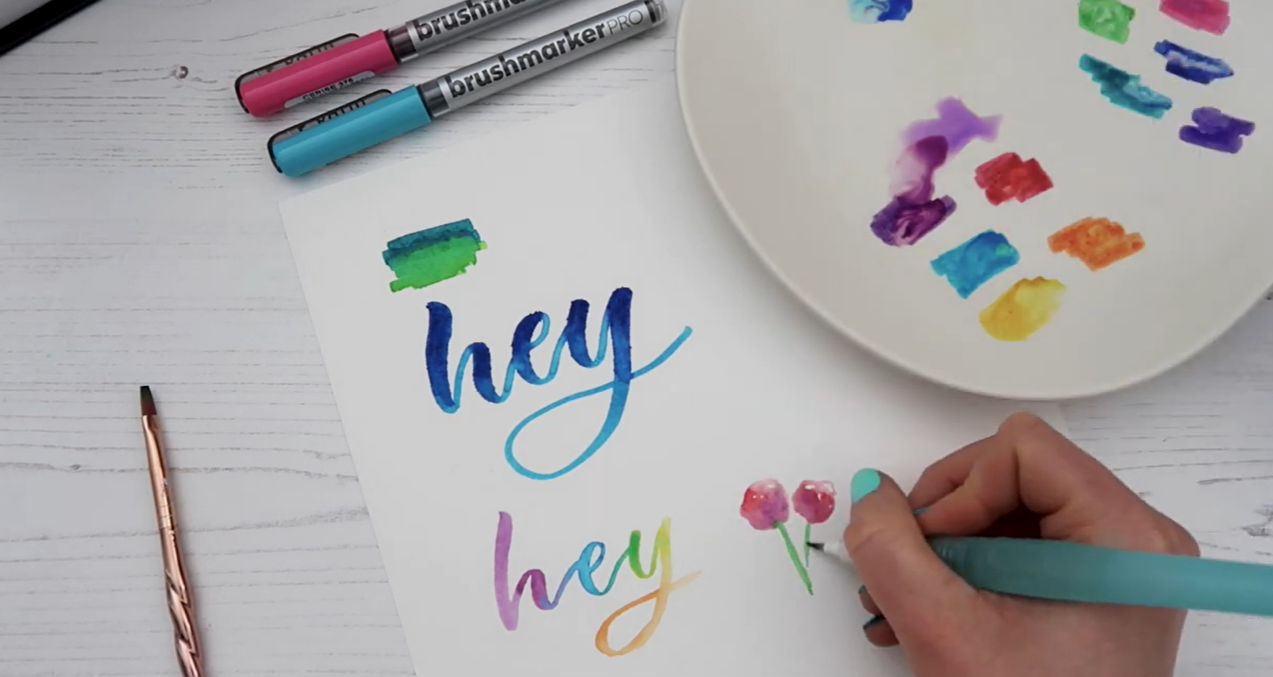
The floral artwork
Create a watercolour background
Another fun thing you can do with water and blending these pens is create watercolour backgrounds.
I’m going to take this really big paintbrush and saturate the page.
Then you can go in and lightly touch the wet paper with some of the ink.
You may find that you see a few ink lines, but you can always go back to your paint palette and pick up some colour there as well.
You can see this is really nice and pastel, but if you want to make it a little bit more pigmented, you can.
For example, you could take the pen and just add a little bit more colour to it.
You do need to work quite quickly with this so you don’t get stroke marks from the pen.
You can see that the colours are blending together really nicely and we’re getting quite a nice washed background.
If you’re using darker colours, just be mindful that you might see some of the strokes. You can build up the colour to hide that a little bit.
How beautiful does that look?
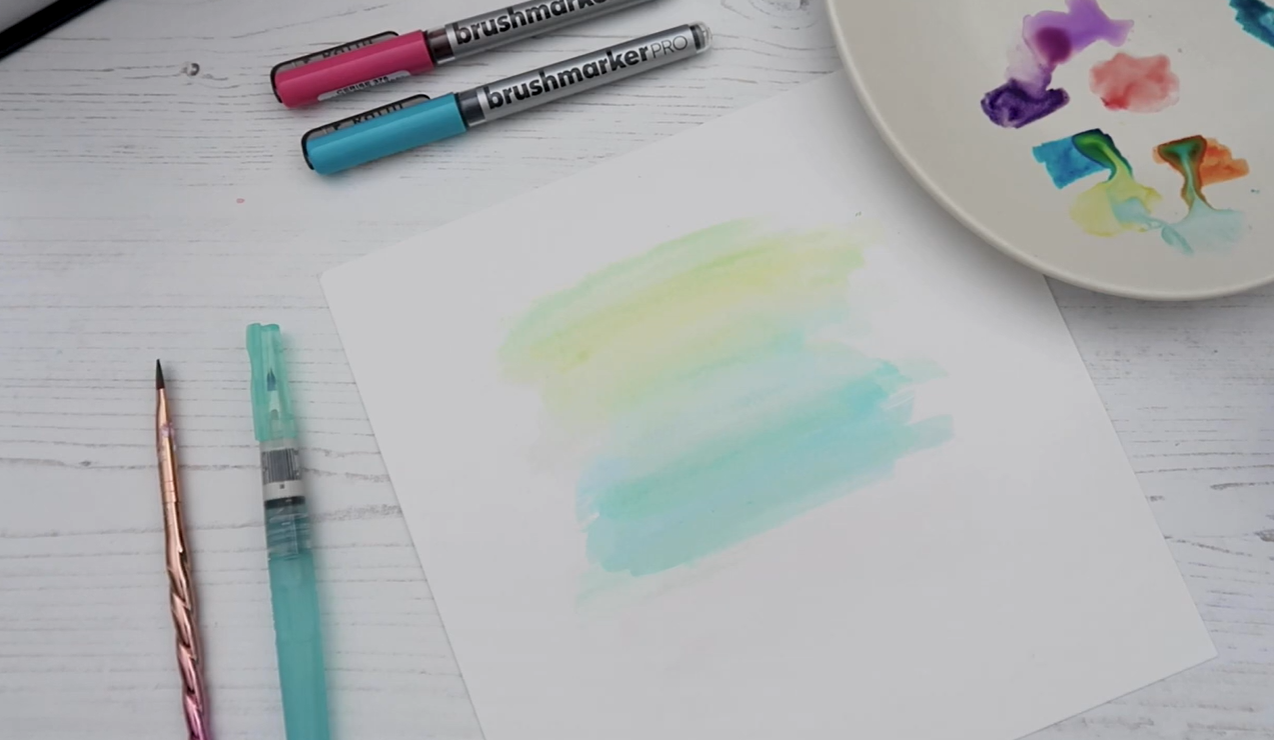
The finished washed watercolour background
So, which blending technique will you try?
And there we have it, a few different ways to blend Karin Brush Marker Pro pens!
I love how many different effects you can create just by experimenting with your pens, a little water, a Blender Pen or even a ceramic dish.
Whether you want to create smooth colour transitions, pastel shades, rainbow lettering, subtle shading or soft watercolour backgrounds, there are so many cool effects you can achieve.
I hope you’ve found this useful and that it’s got you excited to start blending some pretty colours together!
So grab your favourite Karin pens, get your scrap piece of paper ready and have fun experimenting. I can’t wait to see what colour combinations you come up with!
Let’s Stay Connected
If you try this tutorial, I’d love to see what you create!
You can find me here:
Website: https://www.blinklettering.co.uk
Instagram: https://instagram.com/blinklettering
Favourite Supplies:
Some links in this post may be affiliate links. This means I may earn a small commission if you choose to purchase, at no extra cost to you. This helps support Blink Lettering and the free tutorials I share.
Amazon Affiliate Shop: https://www.amazon.co.uk/shop/blinklettering